CRISP Portal Account Set Up
Access
To gain access to the CRISP Portal, your organization must have a permitted participation agreement with CRISP. A HIE Admin at your organization must request or permission user access via a credentialing tool. If you are unsure if your organization has a participation agreement or you do not know who your HIE Admin is contact Technical User Support.
Portal Account Set Up
Users will receive an email with an activation link once their account is created. The email will arrive from ‘donotreply@hmetrix.com’ with the subject line CRISP Portal Activation.
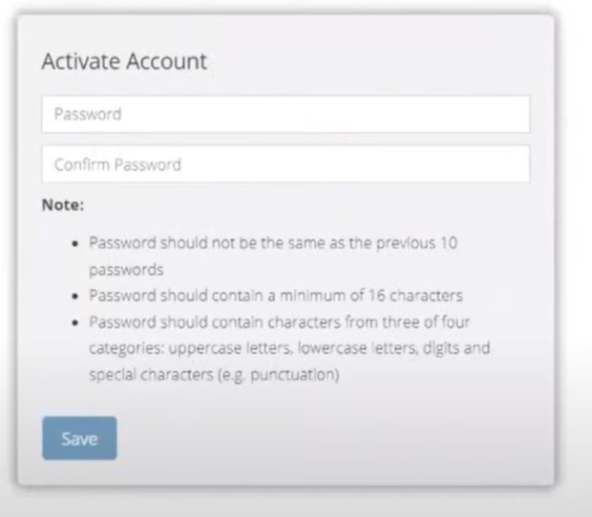
Once the user clicks the activation link, they will be required to set up an account password. Passwords are required to be at least 16 characters -with at least one number, one special character, and one capital letter.
After the password is set up, it is time to register two factor authentication.
Two Factor Authentication (2FA)
To improve security, the CRISP Portal requires that all users set up two-factor authentication for their portal account. Users have three options to meet the two-factor authentication requirement of the CRISP Portal.
- Twilio Authy Application – the preferred method
- Other Authentication Applications – such as Google Authenticator, Microsoft Authenticator, Duo
- Security Key such as a YubiKey
Authy & Other Authenticator Applications
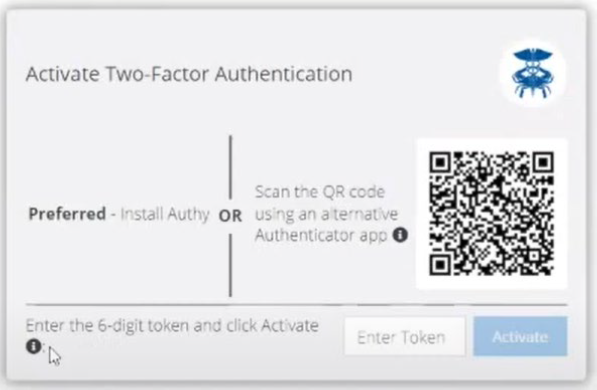
Step 1. Users will be presented with a prompt to register for Two-Factor Authentication as shown in the figure below after they set up their password.
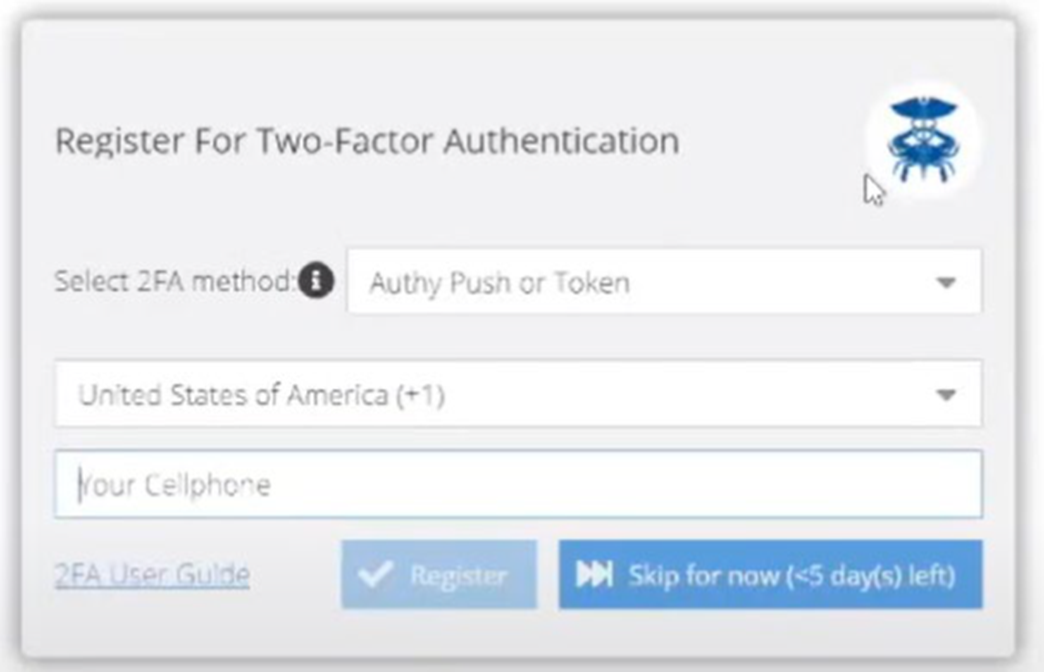
Step 2. Select ‘Authy Push or Token’ as the 2FA method from the dropdown list. The alternative of a security key (FIDO2) requires a hardware key. The security key option in discussed later in this guide.
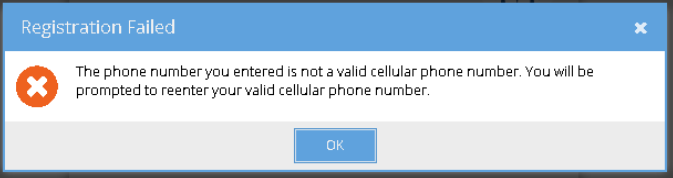
Step 3. Users must enter their cellular phone number and click the Register button. When the user clicks the Register button, the CRISP Portal will validate that the phone number entered is a cellular phone number. If it is not a cellular phone number, a message will display, and the user will be prompted to enter another cellular phone number. User can click the Ok button and reenter the phone number.
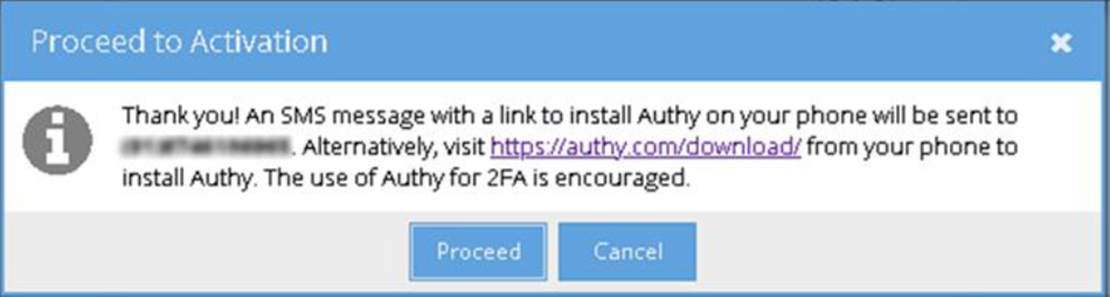
Step 4. After the phone number has been validated, the Proceed to Activation screen shown in the below figure will be displayed. On clicking Proceed, an Authy account will be created with the given phone number, and the user will be taken a screen to ‘Activate 2FA’. If the user clicks the ‘Cancel’ button a message will be displayed and will be returned to the 2FA Activation screen.
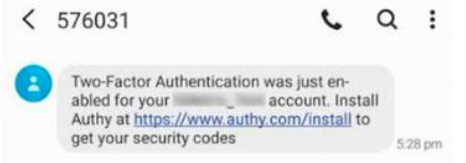
Step 5. Authy will send an SMS text message like the one shown to the right. Authy will autodetect the device type and redirect the user to the appropriate app store to download link. Clicking the link within the text message will prompt the user to download the Authy application onto your registered device.
Step 6. Use of Authy app is strongly preferred. Users can also use an alternative authenticator app, such as Google Authenticator or Microsoft Authenticator. The alternative authenticator app can be used by scanning the QR code in below figure. Please follow the instructions from the alternative authenticator app to scan the QR code. To activate 2FA, users need to enter a 6-digit token in the Activate 2FA screen from Authy or their alternative application of choice. This 6-digit token is available on the newly added CRISP Portal tab in the Authy app or the alternative authenticator app. Users need to enter the 6-digit token in the textbox and clicking the Activate button. If the token is valid users will be granted access to the CRISP Portal. Otherwise, users need to reenter a valid token. If the user refreshes or closes the browser tab before activation is complete, the process must start over from the Registration screen.
Security Key (FIDO2)
The security key method of two-factor authentication is the most secure. It requires a hardware or software key that conforms to the FIFO2 standard. Examples are YubiKey, Google Titan, and Feitian ePass FIDO2 security keys. The instructions below assume possession of such a key and have configured a pin on the key. Please note that a security key cannot be copied or duplicated. Backups of the key are not possible. The key is unique and cannot be substituted with another key.
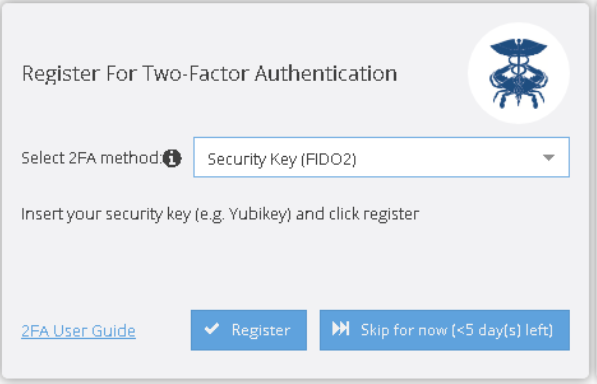
Step 1. Select 2FA method as ‘Security Key (FIDO2)’ from the dropdown list.
Step 2. Insert the security key into the USB port and click the register button to register the key with the CRISP Portal.
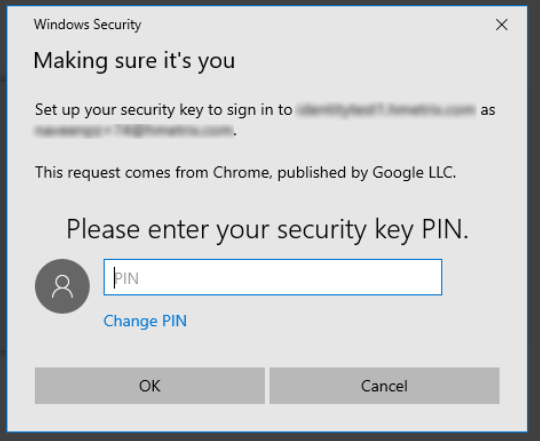
Step 3. Users will be presented with a security screen like the one below. Users need to enter the pin and click OK to continue. Please note that the screen depends on the operating system in use.
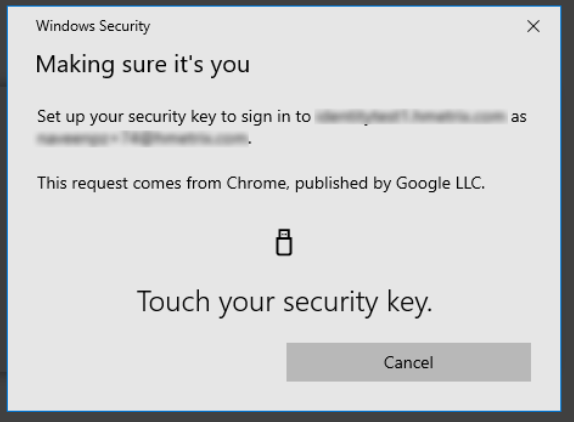
Step 4. Users will be prompted to touch the security key’s button or biometric scanner. Once touched, the key will be registered against the user’s CRISP Portal account and the screen will be redirected to the CRISP Portal. If the user refreshes or closes the browser tab before activation is complete, the process must start over from the Registration screen.
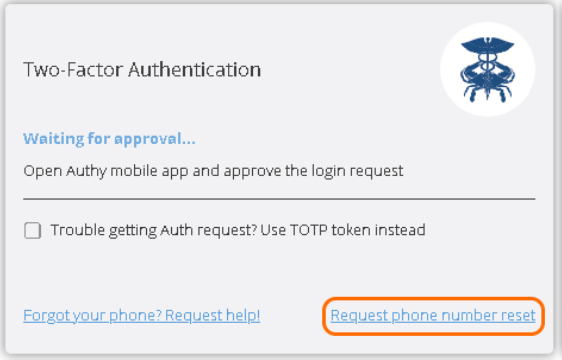
Reset Phone Number or Security Key
If you need to reset your phone number or security key, you may click on the ‘Request phone number reset’ or ‘Request key reset’ link in the CRISP Portal 2FA screen. An email will be sent to the Technical User Support staff requesting a support team member to approve or deny the request. A support team member will verify your identity to approve the request is legitimate. If approved, you must repeat the activation process described in Two-Factor Authentication Set Up section above.